Remove RF25HMEDBBC Ice Chute
Introduction to Removing the RF25HMEDBBC Ice Chute
Dealing with a faulty ice chute on your Samsung RF25HMEDBBC refrigerator? You’re not alone. A clogged or malfunctioning ice chute can disrupt your daily routine. Fortunately, you can remove RF25HMEDBBC ice chute with minimal tools and effort.
This guide offers clear, step-by-step instructions to help you tackle the task confidently. Let’s dive in and restore your ice dispenser’s functionality.
Why You Might Need to Remove the Ice Chute
Ice chutes often clog due to frost buildup or jammed ice. Consequently, this affects the dispenser’s performance. You might notice ice not dispensing properly or water leaking.
Therefore, removing the RF25HMEDBBC ice chute becomes essential for maintenance. By addressing these issues promptly, you ensure your refrigerator operates smoothly. Additionally, regular cleaning prevents future blockages and extends appliance lifespan.
Tools Required to Remove RF25HMEDBBC Ice Chute
Before starting, gather the necessary tools. You’ll need a Phillips screwdriver, a flathead screwdriver, and a soft cloth. Additionally, a small brush helps clean debris. Having a towel nearby is wise for any water spills. With these tools, you’re ready to remove RF25HMEDBBC ice chute efficiently. Always ensure the refrigerator is unplugged for safety.
Safety Precautions Before Starting
Safety is crucial when working on appliances. First, unplug the refrigerator to avoid electrical hazards. Next, clear the workspace to prevent tripping. Additionally, wear gloves to protect your hands. Ensure the area is well-lit for better visibility. By following these precautions, you minimize risks while removing the RF25HMEDBBC ice chute.
Step-by-Step Guide to Remove RF25HMEDBBC Ice Chute
Step 1: Unplug the Refrigerator
Begin by unplugging the refrigerator from the power source. This ensures no electrical current flows during the process. Consequently, you avoid shocks or damage. Check that the power cord is fully disconnected. This simple step is vital for safe ice chute removal. Once confirmed, proceed confidently to the next step.
Step 2: Empty the Ice Bin
Next, remove the ice bin from the freezer. Pull it out gently to avoid spilling ice. Empty any remaining ice into a container. Then, inspect the bin for stuck ice pieces. Clearing the bin ensures easy access to the ice chute. This step prepares you to remove RF25HMEDBBC ice chute without obstructions.
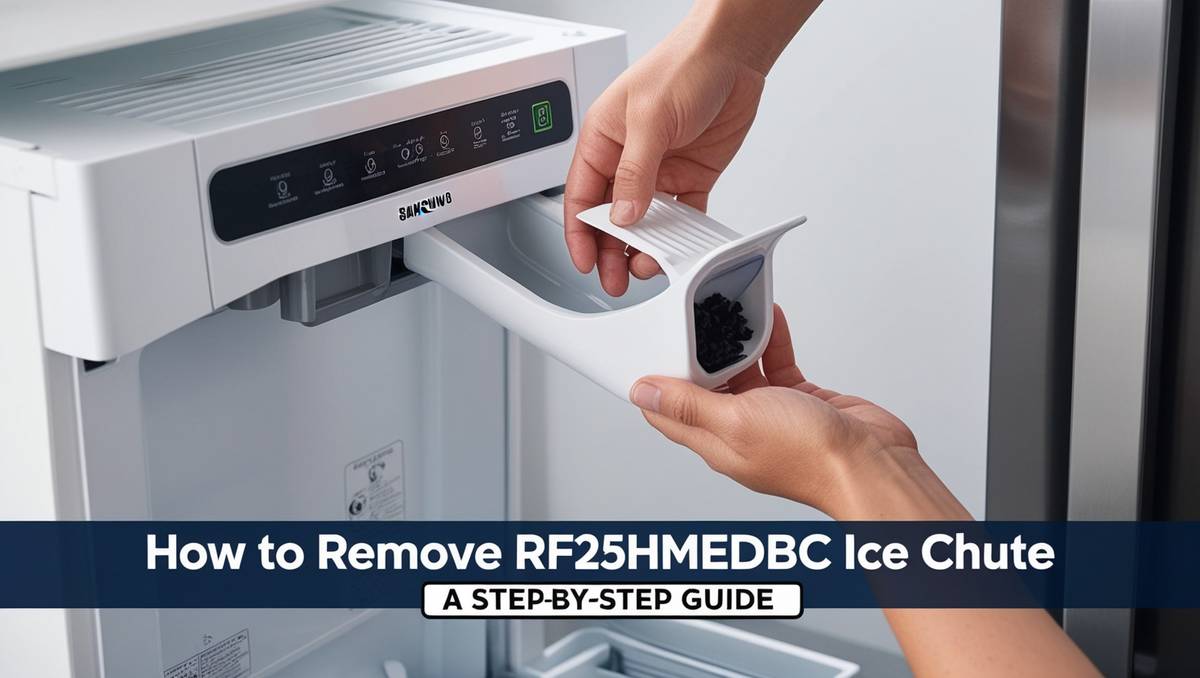
Step 3: Locate the Ice Chute Assembly
Find the ice chute assembly on the freezer door. It’s typically near the dispenser area. Look for a plastic cover or panel. This component directs ice from the maker to the dispenser. Understanding its location helps you proceed efficiently. Therefore, take a moment to familiarize yourself before removing the RF25HMEDBBC ice chute.
Step 4: Remove the Dispenser Panel
Using a flathead screwdriver, gently pry off the dispenser panel. Start at the edges to avoid damaging the surface. Once loose, carefully lift the panel away. This exposes the ice chute mechanism. Be patient to prevent breaking plastic clips. Now, you’re closer to accessing the RF25HMEDBBC ice chute for removal.
Step 5: Unscrew the Ice Chute Assembly
With the panel removed, locate the screws securing the ice chute. Use a Phillips screwdriver to remove them. Place screws in a safe spot to avoid losing them. Then, gently pull the ice chute assembly forward. This step requires care to avoid damaging wires. You’re now ready to fully remove RF25HMEDBBC ice chute.
Step 6: Disconnect Any Wiring
Check for any wiring connected to the ice chute assembly. If present, gently disconnect the wiring harness. Use steady hands to avoid pulling too hard. This ensures no damage to the electrical components. Once disconnected, the ice chute is free. Carefully set the assembly aside for cleaning or replacement.
Step 7: Clean the Ice Chute Area
With the ice chute removed, clean the surrounding area. Use a soft cloth and warm water to wipe away debris. A small brush can help remove stubborn frost. Ensure the area is dry before reassembling. This maintenance step prevents future clogs. Properly cleaning enhances the efficiency of the RF25HMEDBBC ice chute.
Step 8: Inspect for Damage
Examine the ice chute for cracks or wear. Damaged components may need replacement. Additionally, check the seals and gaskets for wear. If issues are found, order genuine Samsung parts. Inspecting ensures long-term functionality. By addressing damage now, you avoid repeated need to remove RF25HMEDBBC ice chute.
Step 9: Reassemble the Ice Chute
Once cleaned or replaced, reassemble the ice chute. Reconnect any wiring harness securely. Then, align the ice chute assembly and screw it back in place. Ensure screws are tight but not overtightened. Finally, snap the dispenser panel back on. This completes the reassembly after removing the RF25HMEDBBC ice chute.
Step 10: Test the Dispenser
Plug the refrigerator back in. Then, test the ice dispenser. Place the ice bin back and press the dispenser lever. Check if ice flows smoothly. If issues persist, double-check connections. Testing confirms successful removal and reinstallation. Your RF25HMEDBBC ice chute should now function perfectly.
Troubleshooting Common Issues
Ice Chute Still Clogged After Removal
Sometimes, clogs persist after removing the RF25HMEDBBC ice chute. Check for hidden ice buildup inside the chute. Use warm water to melt residual frost. Additionally, ensure the ice maker isn’t overproducing ice. Adjust settings if needed. Regular maintenance prevents recurring clogs and ensures smooth operation.
Dispenser Not Working Post-Reassembly
If the dispenser fails, verify all connections. Loose wires or misaligned parts may cause issues. Reopen the panel and check the ice chute alignment. Also, ensure screws are secure. If problems continue, consult a professional. Proper reassembly is key to restoring RF25HMEDBBC ice chute functionality.
Leaking Water from Dispenser
Water leaks often indicate a faulty seal. Inspect the ice chute’s gasket for wear. Replace if necessary. Additionally, check for ice blockages causing overflow. Cleaning the chute regularly prevents leaks. If leaks persist, professional service may be needed. Addressing leaks promptly protects your RF25HMEDBBC refrigerator.
Maintenance Tips to Prevent Ice Chute Issues
Regular maintenance keeps the RF25HMEDBBC ice chute in top shape. Clean the chute monthly to prevent frost buildup. Use a soft cloth and warm water. Also, empty the ice bin regularly to avoid jams. Check seals and gaskets for wear. Consistent care reduces the need to remove RF25HMEDBBC ice chute frequently.
When to Call a Professional
Sometimes, DIY efforts aren’t enough. If the ice chute remains faulty after removal, seek professional help. Complex electrical issues or damaged components require expertise.
Additionally, persistent leaks or noises signal deeper problems. A technician ensures safe, effective repairs. Don’t hesitate to call if removing the RF25HMEDBBC ice chute doesn’t resolve issues.
Benefits of Properly Maintaining Your Ice Chute
Maintaining your RF25HMEDBBC ice chute offers multiple benefits. First, it ensures consistent ice dispensing. Additionally, it prevents costly repairs by addressing issues early. A clean chute enhances hygiene, reducing bacteria growth.
Moreover, proper maintenance extends your refrigerator’s lifespan. Regularly removing and cleaning the RF25HMEDBBC ice chute keeps your appliance running smoothly.
Common Mistakes to Avoid
Avoid common pitfalls when removing the RF25HMEDBBC ice chute. Don’t force the dispenser panel off, as it may break. Additionally, never skip unplugging the refrigerator. Overtightening screws can damage the assembly. Also, avoid using harsh chemicals for cleaning. By steering clear of these mistakes, you ensure a smooth removal process.
How Often Should You Remove and Clean the Ice Chute?
Clean the RF25HMEDBBC ice chute every 1–2 months. Frequent use or high humidity may require monthly cleaning. Regular removal prevents frost and debris buildup. Additionally, inspect the chute during cleaning for wear. Consistent maintenance reduces clogs and ensures efficient ice dispensing. Set a schedule to stay on top of this task.
FAQs About Removing RF25HMEDBBC Ice Chute
How long does it take to remove RF25HMEDBBC ice chute?
Removing the RF25HMEDBBC ice chute typically takes 20–30 minutes. This includes unplugging the refrigerator, disassembling the chute, and cleaning. With practice, you may complete it faster. Ensure you follow safety steps to avoid rushing, which can lead to mistakes.
Can I remove the ice chute without tools?
You’ll need basic tools like a Phillips and flathead screwdriver to remove RF25HMEDBBC ice chute. Without tools, you risk damaging the dispenser panel or chute assembly. Always use the right tools for safe and effective removal. A soft cloth is also helpful for cleaning.
What if I damage the ice chute during removal?
If you damage the RF25HMEDBBC ice chute, order a genuine Samsung replacement part. Avoid using a damaged chute, as it may cause leaks or malfunctions. Follow the removal steps carefully to prevent damage. If unsure, consult a professional for assistance.
Why does my ice chute keep clogging?
Clogs in the RF25HMEDBBC ice chute often result from frost buildup or ice jams. High humidity or frequent dispenser use can contribute. Regular cleaning and emptying the ice bin prevent clogs. Also, check the ice maker settings to avoid overproduction.
Is it safe to remove the ice chute myself?
Yes, removing the RF25HMEDBBC ice chute is safe if you follow precautions. Unplug the refrigerator, work in a well-lit area, and use proper tools. Avoid forcing components to prevent damage. If you’re unsure, hire a professional to ensure safety and accuracy.
Conclusion: Keep Your RF25HMEDBBC Ice Chute in Top Shape
Removing the RF25HMEDBBC ice chute is a straightforward task with the right approach. By following this guide, you can tackle clogs, maintain your refrigerator, and ensure smooth ice dispensing. Regular cleaning and proper reassembly are key to long-term performance. Don’t let a faulty ice chute disrupt your routine—take action today! Start by gathering your tools and confidently remove RF25HMEDBBC ice chute to restore your refrigerator’s functionality.